
Dataset Anonymization for Image Model Training
One blurred face is not enough. If you train on image data with people in it, I’d treat privacy as a full pipeline issue: visible identifiers, hidden metadata, labels, consent records, storage, and synthetic outputs all need review.
Here’s the short version:
- I start with a privacy risk check for direct identifiers and indirect clues
- I remove or hide faces, plates, badges, tattoos, and other visible markers
- I strip EXIF, IPTC, and XMP data, including GPS, timestamps, and device details
- I clean labels by replacing names, addresses, clinic references, and other sensitive text
- I track consent, allowed use, retention, and revocation in a dataset manifest
- If editing is not enough, I use synthetic replacement and test it for leakage
- I keep raw, processed, and shareable files in separate local storage areas
A few numbers stand out. One cited 2024 study says 87% of smartphone photos had GPS in EXIF by default. Another cited study found membership inference exposure as high as 82% in one health dataset and 44% in another at 0.9 precision. So the point is simple: de-identification lowers risk, but it does not remove it.
Quick comparison:
| Method | What I use it for | Main risk | Effect on training |
|---|---|---|---|
| Blur or mask | Hide faces and visible identifiers | Weak or repeated edits may still be reversed or linked | Often low to moderate |
| Metadata stripping | Remove hidden file data | Pixels still may identify people | None on image quality |
| Label cleanup | Remove names and sensitive text | Free text may still slip through | Usually low |
| Synthetic replacement | Keep pose or scene cues while replacing identity | Leakage or memorization | Can stay high if tested well |
If I had to boil the full process down to one line, it would be this: protect the pixels, the file data, the labels, and the access path - not just the face.
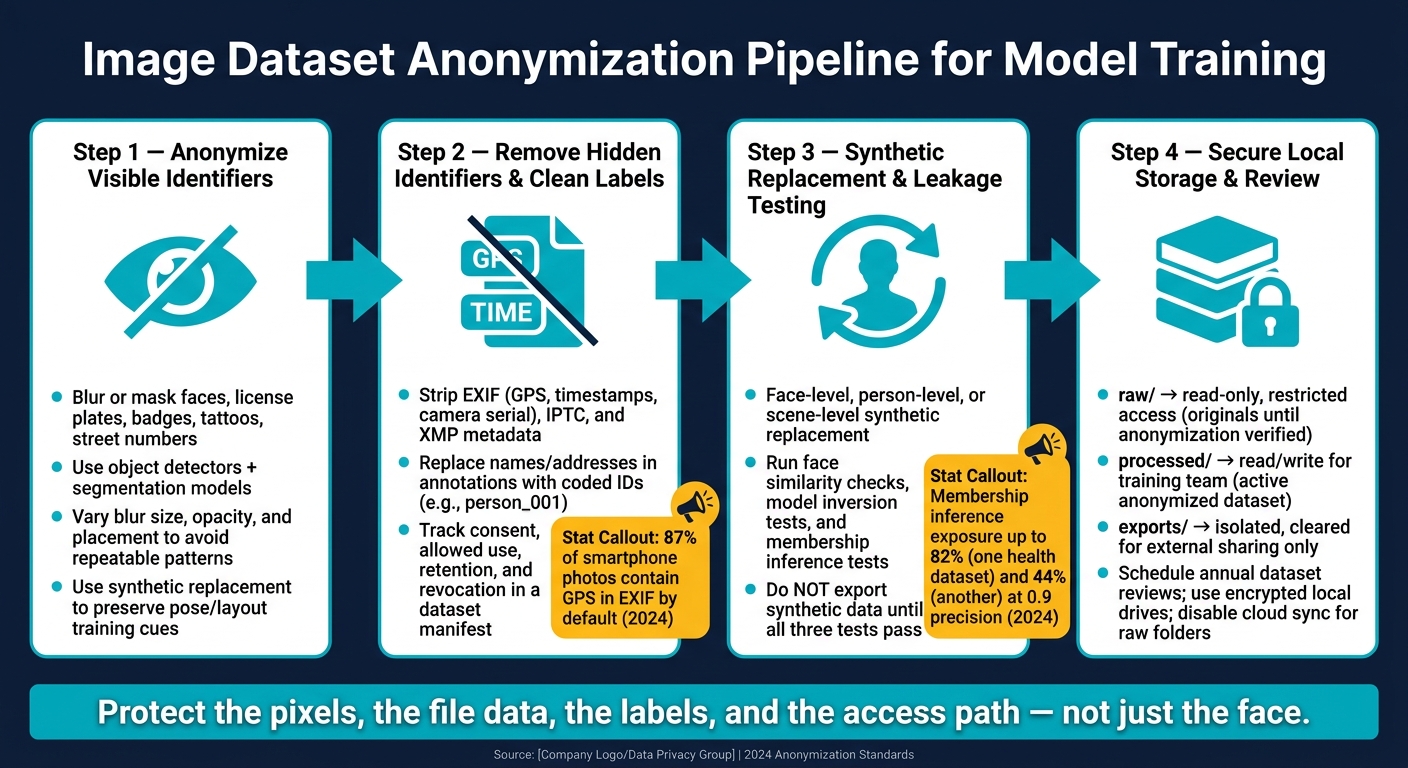
Image Dataset Anonymization Pipeline: 4-Step Privacy Workflow
Step 1: Anonymize Visible Identifiers in Images
This step lowers how much someone can identify from the image itself before you remove hidden data.
Blur or mask faces and sensitive regions
Start by finding faces and other plain-to-see identifiers, then blur or mask them. License plates, badges, tattoos, street numbers, and unique backgrounds can also lead back to a real person. A good setup is to use an object detector for faces and plates, then a segmentation model for uneven identifiers like tattoos, jewelry, or badges.
Don’t apply the exact same edit every time. Change blur size, opacity, and placement so the obfuscation pattern doesn’t repeat across the dataset.
Use synthetic replacement to preserve training utility
Use synthetic replacement when masking would remove training cues like pose, layout, or interaction. The comparison below helps you pick the lighter edit that still protects identity.
Image anonymization methods compared
| Method | Best for | Tradeoff |
|---|---|---|
| Strong blur or mask | Removing identifiers when context is not needed | Risk of recovery if blur is weak or consistent |
| Synthetic replacement | Preserving pose, layout, or interaction | Preserves context, but may shift realism |
Once you’ve reduced visible identifiers, move on to metadata and label cleanup. Next, remove hidden identifiers from metadata and labels.
sbb-itb-903b5f2
Step 2: Remove Hidden Identifiers and Clean Labels
Visible edits matter, but they’re only part of the job. File-level data can still point back to a person or place. After you remove what people can see, strip the hidden identifiers in metadata and labels too.
Strip EXIF, IPTC, and XMP metadata before training
Image files often carry three separate metadata containers: EXIF (camera and device info), IPTC (editorial fields like captions and keywords), and XMP (extensible descriptive tags). Any one of them can hold details that identify someone or reveal a location. The safest default is simple: remove everything, then add back only what your model needs.
Start with the highest-risk fields:
- GPS coordinates
- Precise timestamps
- Camera serial numbers
- Owner, author, and copyright fields
Street-level GPS latitude and longitude can point straight to a home address. Add timestamps, and you may be able to piece together where someone was on a given day. In one 2024 study cited by the International Press Telecommunications Council, 87% of smartphone photos contained GPS coordinates in EXIF metadata by default.
A good first step is to inspect a sample file with a command like exiftool -a -u -g1 sample.jpg. That shows every tag present. From there, run a batch strip across the dataset directory. Some fields, such as image width, height, and color space, are usually safe to keep if your pipeline depends on them. After stripping, spot-check a small set of files to make sure the tags are gone and the images still load in your training pipeline.
PNG files need the same care. They can store text chunks that include user IDs or software metadata. In plain terms, don’t treat non-JPEG formats as clean just because they look simpler.
Once metadata is gone, turn to the annotation files that move with the images.
Replace names and sensitive annotations with coded labels
Labels can create just as much privacy risk as the image itself. A label like John Doe recovering from heart surgery at Mercy Hospital is still a problem even if the person’s face is blurred. Names, street addresses, clinic names, medical references, and very specific job titles in annotation text can all identify a real person.
Replace names with coded IDs, and swap specific places for broader categories. For medical datasets, convert detailed notes into category-level labels. For example, Stage II HER2+ breast cancer becomes breast cancer. That keeps the dataset useful without exposing identity.
At scale, this works best as a two-part process. Use automated scans with regex patterns to catch emails, phone numbers, and ID formats. Then do a human review pass for free-text fields, since automated tools often miss those edge cases. It also helps to keep a label taxonomy: a short document that lists allowed categories, banned content types, and the standard format for coded identifiers. That way, every contributor follows the same playbook.
After labels are cleaned up, you need a record of the rules tied to each file.
Track consent and data-use permissions in a dataset manifest
Consent tracking should sit in the same pipeline as metadata stripping and label cleanup. Record source, consent scope, allowed use, retention, and revocation in a dataset manifest. This can be a machine-readable file like JSON or YAML, paired with a human-readable summary. Without that record, deletion requests become messy, and shared exports can include images that should’ve been left out.
The table below shows the main fields to track and the privacy action tied to each one:
| Element | Field | Privacy Risk | Anonymization Action | Training Impact |
|---|---|---|---|---|
| Metadata | GPSLatitude / GPSLongitude |
High | Strip entirely | None |
| Metadata | CameraSerialNumber |
High | Strip entirely | None |
| Metadata | DateTimeOriginal |
High | Strip entirely | Low |
| Metadata | OwnerName / Artist |
High | Strip entirely | None |
| Label | Person name in annotation | High | Replace with coded ID (e.g., person_001) |
Low |
| Label | Specific clinic or address | Medium | Generalize to a broader category or remove entirely | Low |
| Consent | Allowed use scope | High | Document and enforce restrictions | High |
| Consent | Revocation status | High | Exclude flagged records from all future training runs | High |
| Consent | Retention window | Medium | Set review and deletion dates; re-consent if expired | Medium |
If a subject withdraws consent, the revocation flag in the manifest is what tells the preprocessing pipeline to leave those images out of future training runs.
Step 3: Replace or Reduce Sensitive Data When Editing Is Not Enough
When blurring, masking, cropping, and metadata stripping still leave identity risk on the table, move to synthetic replacement. This matters a lot in person-centered datasets, like hospital footage or face datasets, where identity cues can stick around even after careful anonymization.
Create synthetic replacement data for person-centric datasets
Use the smallest synthetic replacement that still keeps the training signal. That’s the sweet spot.
Synthetic replacement can happen at three levels, based on what the task needs:
- Face-level replacement swaps real faces with generated ones while keeping pose, lighting, and background the same.
- Person-level replacement replaces the full person inside the original bounding box.
- Scene-level replacement rebuilds the full setting synthetically, using statistics from the real data.
A simple rule: pick the lightest replacement that still lets the model do its job. Extract poses, boxes, or segmentation maps first, then generate synthetic images locally.
Test privacy and utility before relying on synthetic outputs
Synthetic data is not safe by default. A 2024 NeurIPS study found that all six tested synthetic face recognition datasets leaked samples from the original real datasets.
Before you trust synthetic outputs, run three checks:
- Compare synthetic images against the original dataset with a face recognition or person re-identification model. Generated faces should show low similarity to any real person.
- Try model inversion to check whether synthetic samples can rebuild underlying training images.
- Run membership inference tests to estimate how easy it is to tell training images apart from non-members.
The risk here isn’t small. In partially synthetic health data, 82% of people in one dataset and 44% in another were open to membership inference at a 0.9 precision threshold.
Do not export synthetic data until it passes all three tests.
Direct anonymization vs. synthetic data: a side-by-side comparison
Use the table to pick the lowest-risk option that still fits the model.
| Method | Privacy Guarantees | Model Utility | Implementation Complexity | External sharing? |
|---|---|---|---|---|
| Face blurring / pixelation | Reduces facial detail; coarse identity cues may remain | Good for pose or scene tasks | Low | Often acceptable for internal use |
| Masking / cropping | Removes masked regions; body shape may still identify | Can hurt performance if masked areas carry signal | Low to moderate | Better than raw; still sensitive for person-centric tasks |
| Metadata stripping | Removes hidden identifiers; pixels unchanged | No impact on visual utility | Very low | Baseline hygiene for all sharing |
| GAN / VAE synthetic (non-DP) | Reduces direct exposure; leakage and memorization risk remain | High if well trained | High | Only after leakage tests show low risk |
| Differentially private synthesis | Formal privacy bounds; stronger protection | Often reduced quality and accuracy | Very high | Best for regulated domains like healthcare or finance |
Direct anonymization is simpler and often enough for low- to moderate-risk datasets. Synthetic generation, especially with differential privacy, makes more sense when data will be shared outside the organization or when the dataset sits in a regulated area like healthcare or finance. Keep synthetic outputs local until leakage tests show low risk.
Step 4: Store, Process, and Review the Dataset Locally
After anonymization, lock down storage so raw files don't slip back into the workflow. Bad storage habits can wipe out the face, metadata, label, and synthetic-data work from the earlier steps. If raw files are still easy to reach after preprocessing, a lot of that privacy work goes out the window.
Separate raw files, anonymized copies, and shareable exports
Use three separate storage tiers:
| Storage Tier | Access Level | Purpose |
|---|---|---|
| raw/ | Read-only, restricted to authorized roles | Original files kept only until anonymization is verified |
| processed/ | Read/write for the training team | Anonymized working dataset used for active model training |
| exports/ | Isolated, cleared for external sharing | Fully stripped and reviewed files safe for distribution |
Training scripts should have read-only access to data and write access only to approved output folders. That helps prevent changes to source files and cuts down exposure during training runs.
Set the retention deadline before processing starts. Then delete or archive raw copies once anonymization is verified. After verification, delete raw working copies or move them to a restricted archive with documented access controls.
Schedule at least annual reviews of your dataset inventory. Check which raw and intermediate files are still needed, then delete or archive the rest. Automated deletion routines can help stop raw images and temporary preprocessing outputs from hanging around after training ends.
Use privacy-first local tools in your workflow
Once the files are cleaned, process them locally so you don't re-expose them through cloud tools. Every external service adds logging and retention risk. Use local tools that keep files on the user's device. Also turn off automatic cloud sync for raw folders, and use encrypted local drives for all three storage tiers. Share only the sanitized exports/ folder.
Conclusion: An anonymization checklist for image training datasets
Use this final pass to confirm the dataset is ready for training.
Before training, verify:
- [ ] Raw files are isolated in a read-only folder with restricted access
- [ ] Anonymized copies are in the active training folder, separate from raw sources
- [ ] Shareable exports are isolated and reviewed before any external distribution
- [ ] Faces, license plates, ID cards, and other visible identifiers have been blurred, masked, or replaced
- [ ] EXIF, IPTC, and XMP metadata has been stripped from all files
- [ ] Sensitive labels and annotations have been replaced with neutral terms
- [ ] Consent or permission records are attached to each batch in the dataset manifest
- [ ] Synthetic or replacement data has been reviewed for privacy and utility
- [ ] Retention deadlines are documented and deletion routines are scheduled
- [ ] A review date is set
Anonymization is not a one-time step. It's a workflow. This checklist makes the process repeatable and auditable, so each new dataset starts from a controlled baseline instead of an informal one.
FAQs
How much anonymization is enough?
Enough anonymization is the simplest way to meet your privacy and image quality needs. There’s no absolute privacy guarantee once training has happened.
Focus on the basics: collect only the data you need, keep content, logs, and billing records separate, use anonymized identifiers, strip out identifiable metadata, avoid logging sensitive content, and review retention practices before training starts, because removing data later is almost impossible.
Can blurred images still identify someone?
Yes. Blurred images can still reveal someone’s identity.
Simple blurring or masking often isn’t enough. A person’s identity can still be pieced together or inferred when that image is combined with other available information.
Research also shows that inversion and reconstruction attacks can recover sensitive details from processed training data. That’s why it’s safer to use layered protections, such as differential privacy, instead of relying on blurring alone.
When should I use synthetic data instead?
Use synthetic data when you need to protect privacy and avoid exposing real user information, especially for rules like GDPR, HIPAA, or CCPA.
It can also help when you need to share anonymized data or train safety classifiers without revealing original training details.
That said, there’s a trade-off. Privacy gains can come at the cost of usefulness. Synthetic data may miss outliers or underrepresented classes, which can limit how well it reflects the source data. On the upside, it can cut risks like membership inference or data contamination.