5 Steps to Implement Certificate-Based API Authentication
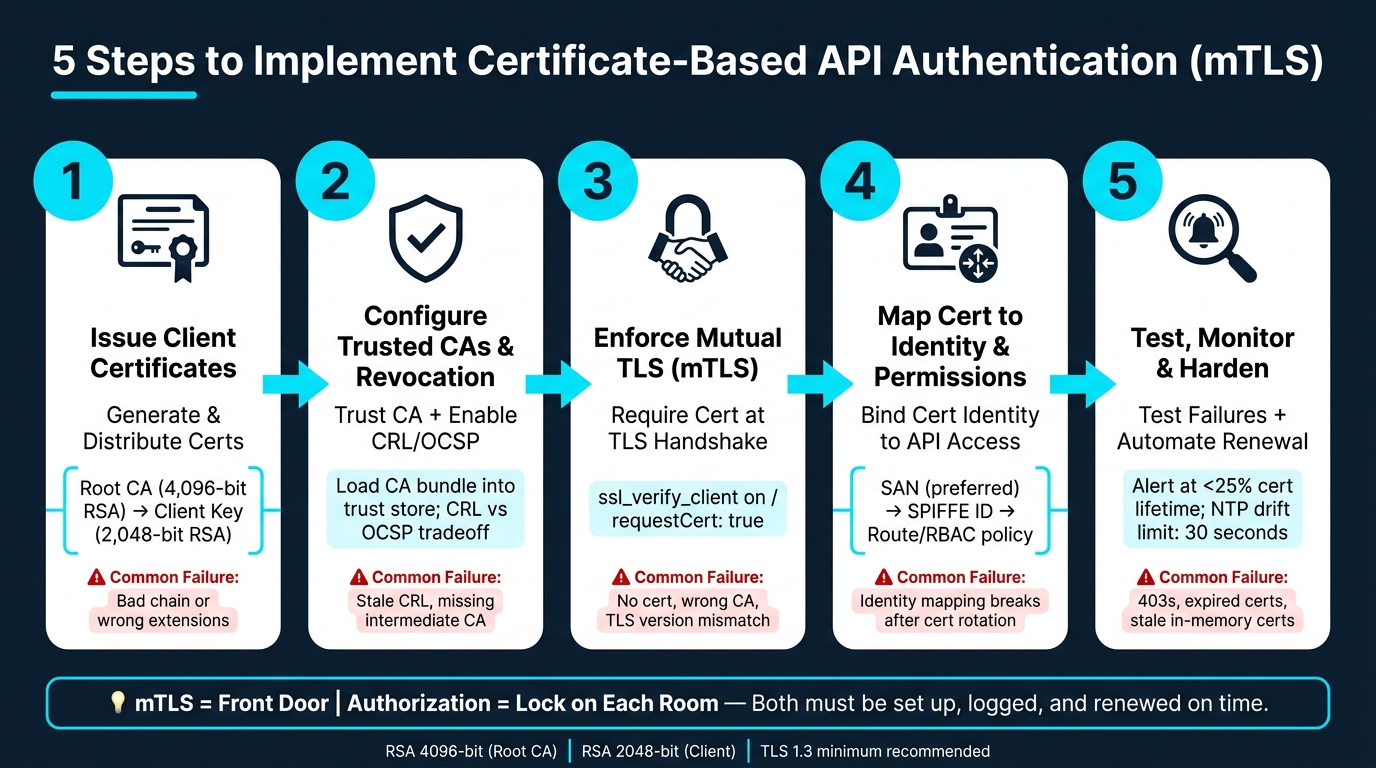
If I want certificate-based API authentication to work, I need five things in place: issue client certs, trust the right CA, require mTLS at the edge, map cert identity to API access, and test failure cases before production.
This setup does two jobs at once: it proves the client holds the matching private key, and it blocks requests before app code runs when the cert is missing, expired, revoked, or signed by the wrong CA. In practice, that means fewer shared secrets, tighter service-to-service access, and cleaner control over who can call sensitive endpoints.
Here’s the full process in plain English:
- Step 1: Create a root CA, issue a client certificate, and keep the private key on the client side only
- Step 2: Load the CA bundle into the API trust store and turn on revocation checks with CRL or OCSP
- Step 3: Require client certificates during the TLS handshake with settings like
ssl_verify_client onorrequestCert: true - Step 4: Bind certificate data like SAN, CN + issuer + serial, or a custom OID to an internal identity and route policy
- Step 5: Test both pass and fail cases, watch logs, automate renewal, and alert before expiry or clock drift breaks requests
A few details stand out. The article uses a 4,096-bit RSA key for the root CA, 2,048-bit RSA for client keys, and warns that even 30 to 90 seconds of clock drift can trigger x509 time errors. It also points out that a cert can pass mTLS and still get a 403 Forbidden if the identity is not allowed on that route.
5 Steps to Implement Certificate-Based API Authentication (mTLS)
How To Secure Your APIs with mTLS (Mutual TLS Explained Simply!)
sbb-itb-903b5f2
Quick comparison
| Step | What I’m doing | Main goal | Common failure |
|---|---|---|---|
| 1 | Issue client certs | Prove key ownership | Bad chain or wrong extensions |
| 2 | Trust CA and check revocation | Accept only approved issuers | Stale CRL, missing intermediate |
| 3 | Enforce mTLS | Block bad clients at handshake | No cert, wrong CA, TLS mismatch |
| 4 | Map cert to identity | Control route and method access | Bad identity binding after rotation |
| 5 | Test and monitor | Catch expiry, drift, and reload issues | 403s, expired certs, stale in-memory certs |
Bottom line: I’d treat mTLS as the front door, and authorization as the lock on each room. Both have to be set up, logged, and renewed on time for the system to hold up.
Step 1: Generate and Distribute Client Certificates
Create a CA, Client Key Pair, and Signed Certificate
This is the certificate issuance side of mTLS. Follow the sequence exactly.
Start by creating a private root CA with a 4096-bit RSA key. This CA is the trust anchor for your API server or gateway.
Next, create a 2048-bit RSA private key for the client, generate a CSR with a clear CN such as /CN=payment-service, and sign that CSR with the CA.
Here are the exact OpenSSL commands:
| Step | Command |
|---|---|
| Create Root CA | openssl req -x509 -newkey rsa:4096 -keyout ca.key -out ca.pem -days 3650 |
| Create Client Key | openssl genrsa -out client.key 2048 |
| Create Client CSR | openssl req -new -key client.key -out client.csr -subj "/CN=my-api-client" |
| Sign Client CSR | openssl x509 -req -in client.csr -CA ca.pem -CAkey ca.key -CAcreateserial -out client.pem -days 365 |
After signing, verify the chain before you distribute anything:
openssl verify -CAfile ca.pem client.pem
If this command doesn't return OK, the signing step failed somewhere. Stop there and fix it before moving on.
That handles issuance. The next part is trust.
Set Client Certificate Extensions and Store Private Keys Safely
Set these certificate extensions:
extendedKeyUsage = clientAuthkeyUsage = digitalSignature, keyEncipherment
These fields separate client certificates from server certificates. That matters, because the cert needs to match its job.
There’s also a simple rule for key handling: generate the private key and CSR on the client, send only the CSR to the CA, and return only the signed certificate. The private key should never cross the network.
Store private keys in an OS keychain, a secrets manager, or an HSM.
Keep certificate lifetimes short, and automate renewal with cert-manager or step-ca.
With issuance done, Step 2 tightens which CAs the API trusts and how revoked certificates get blocked.
Step 2: Configure Trusted CAs and Revocation Checks
Import CA Certificates into the API Trust Store
After issuance, point the API server to the CA bundle that signed the client certificates from Step 1. Use a PEM bundle with the root CA and any intermediate CA certificates. The exact setting depends on the platform:
| Platform | Configuration Field | Example Value |
|---|---|---|
| NGINX | ssl_client_certificate |
Path to the CA bundle PEM file |
| Apache | SSLCACertificateFile |
Path to the trusted CA file |
| Envoy | trusted_ca |
Set in common_tls_context.validation_context.trusted_ca |
| AWS API Gateway | TruststoreUri |
S3 URI pointing to the CA bundle |
| Node.js | ca |
Property in https.createServer options |
For NGINX, set ssl_verify_client on; and ssl_verify_depth 2;. That tells the server to check both the client certificate and the intermediate CA.
Once the server trusts the issuing CA, add revocation checks so certificates that should no longer work get blocked.
Enable CRL or OCSP and Keep Environments Separate
CRL (Certificate Revocation List) is a file that lists revoked serial numbers. Your server downloads it and caches it. OCSP (Online Certificate Status Protocol) checks certificate status live against a CA responder.
Each option has a tradeoff:
- CRLs have lower and more predictable latency, but they can go stale between updates.
- OCSP gives newer status data, but it adds TLS handshake latency and depends on the OCSP responder being up.
Revocation checks help, but they shouldn't do all the heavy lifting. Pair them with short certificate lifetimes. When certs expire fast, the damage window stays smaller.
Keep production, staging, and development split with separate trust bundles. Store PEM bundles as versioned artifacts in object storage, and alert any time a service presents a certificate from a retired or unexpected CA.
With trust and revocation set up, the next step is to require client certificates during the TLS handshake.
Step 3: Enable Mutual TLS on API Endpoints
After importing the CA bundle in Step 2, the next move is simple: make the client certificate mandatory during the TLS handshake.
Require Client Certificates at the Server or Gateway
Certificate checks should happen at the transport layer, not inside app code.
Once the CA is trusted, enforce certificate validation during the handshake itself. That way, requests from clients without a valid cert get stopped before they ever reach your app. Here’s what that looks like on common platforms:
| Platform/Framework | Configuration Setting | Certificate data source |
|---|---|---|
| NGINX | ssl_verify_client on; and ssl_client_certificate /path/to/ca.crt; |
Variables like $ssl_client_s_dn_cn or $ssl_client_serial |
| Node.js (https) | requestCert: true, rejectUnauthorized: true, and ca: fs.readFileSync('ca.crt') |
req.socket.getPeerCertificate() |
| Python (Uvicorn) | ssl_cert_reqs=ssl.CERT_REQUIRED |
ssl_context or framework request object |
| AWS API Gateway | Custom domain with mutual-tls-authentication and a truststore in S3. Disable the default execute-api endpoint to prevent bypass. |
event['requestContext']['authentication']['clientCert'] or event['requestContext']['identity']['clientCert'] |
| Tyk Gateway | use_mutual_tls_auth: true |
Tyk Certificate Store / Session Object |
After the handshake succeeds, read the verified certificate from the request context and pass only the identity fields your auth layer needs. If you’re using NGINX as a reverse proxy, a common pattern is to map that value into a header like X-Client-CN for downstream auth.
Test the Handshake with a Certificate-Enabled API Client
Once enforcement is on, test both the happy path and the failure paths. Before moving on, run these three checks:
- Valid certificate - should return
200 OKwith the handshake completing cleanly. - No certificate - should fail with a TLS alert or
403 Forbidden. - Untrusted CA - should fail at the handshake with
unable to get local issuer certificate.
Use curl to confirm the handshake:
curl -iv --cert client.crt --key client.key --cacert ca.crt https://api.example.com
The -v flag shows the full handshake, so you can verify that the server sent a Request CERT message.
If you need a closer look, use:
openssl s_client -connect <host>:<port> -cert client.crt -key client.key -CAfile ca.crt -verify_return_error -showcerts
This is handy when something breaks. It shows where the failure happens, whether that’s a chain issue, an expired validity window, or a cipher mismatch.
Also, alert on NTP drift above 30 seconds. Short-lived certificates can fail fast when system time slips.
Map the verified identity to authorization rules in Step 4.
Step 4: Map Certificates to Identities and API Permissions
Once the certificate is verified, the job shifts from authentication to authorization. mTLS confirms who the client is. After that, you need to map that certificate to a stable identity and the right API permissions.
Choose Certificate Fields for Identity Binding
Not every certificate field makes a good identity anchor. Pick the one your gateway can extract without trouble and your auth layer can validate the same way every time.
| Certificate Field | Pros | Cons | Typical Use Case |
|---|---|---|---|
| Subject Alternative Name (SAN) | Supports SPIFFE IDs; flexible for microservices; survives rotation | Needs more parsing logic | Service-to-service auth in Kubernetes/Istio |
| Issuer CN + Subject CN + Serial Number | Unique when combined and hashed | Needs a lookup to map back to a readable identity | B2B partner onboarding and tracking |
| Custom OID | Can carry metadata like TenantID or ProjectID directly |
Needs control over the CA issuance process | Multi-tenant platforms and project-level attribution |
| Common Name (CN) | Simple to extract; widely supported | Not guaranteed to be unique across issuers; legacy field | Legacy systems only |
| Thumbprint (SHA-256) | Unique to the exact certificate file | Changes on every rotation, which can break identity mappings | High-security pinning for specific partners |
For modern service auth, SAN is usually the best primary identity anchor. It works well for microservices and stays stable through certificate rotation.
For B2B setups, a common pattern is to hash Issuer CN + Subject CN + Serial Number into a stable partner ID. That gives you a fixed internal key, even if you don’t want to use raw certificate fields across the stack.
For multi-tenant AI APIs such as NanoGPT, custom OIDs can carry a project ID that feeds access control and billing attribution. That can save a lot of glue code later.
Apply Route-Level Authorization and Certificate Rotation Rules
Once identity is stable, tie it to route, method, and rate-limit rules. In plain English: the certificate gets you in the door, but the mapped identity decides what you can do.
At the gateway, extract the verified identity, map it to a partner or project record, and apply policy through RBAC or ABAC. That policy key should also show up in audit logs. If something goes wrong, you want one clear ID to trace from the TLS handshake to the API request.
Use stable identifiers, such as a SPIFFE ID or an internal project ID, so certificate rotation doesn’t break permissions. If you bind access to a certificate thumbprint alone, rotation can turn into a mess fast.
During rotation, issue the new certificate before the old one expires, update the identity map first, and alert on remaining certificate lifetime.
The final step is testing, monitoring, and hardening the setup.
Step 5: Test, Monitor, Harden, and Wrap Up
After you map certificates to identities, the next job is simple: make sure the full mTLS flow works in production, then lock down renewal and alerts.
Run Failure-Case Tests and Review Logs
Start by checking that bad certificates fail during the handshake. If this part is loose, the whole setup is shaky.
Here are the main cases to test:
| Test Scenario | Expected Result | Likely Error |
|---|---|---|
| Valid cert from trusted CA | Success | 200 OK |
| Missing client certificate | Handshake failure | TLS alert or 403 Forbidden |
| Certificate from untrusted CA | Handshake failure | "certificate unknown" / 400 |
| Expired or revoked cert | Handshake failure | 403 Forbidden |
| Valid cert, unauthorized route | Authorization failure | 403 Forbidden |
That last row matters more than it may seem. A valid certificate should not mean blanket access. The handshake can pass, and the request can still be blocked if that identity is not allowed to reach the route.
Once you sort these failure types, make them easy to spot in logs and alerts. Record the failure reason, client IP, CN, and serial number. On Nginx or Apache, built-in variables like $ssl_client_verify and $ssl_client_s_dn make it easy to pass identity details to backend apps through headers.
Also, log the identity-to-route decision itself. In plain English: don’t just track whether TLS worked. Track whether the mapped identity had permission for that exact resource.
Set alerts when a certificate has less than 25% of its lifetime left. That rule works well whether a cert lasts 24 hours or a full year.
Harden Crypto Settings and Document Renewal Workflows
Use the same telemetry to catch drift, expiry, and rotation mistakes before users run into them.
Where possible, set TLS 1.3 as the minimum. Use 4,096-bit RSA for your root CA, and at least 2,048-bit RSA for client and server certificates with SHA-256 signing. Short-lived certificates also help limit blast radius. A 24-hour lifetime cuts down the damage if a key is stolen.
For rotation, automate it with tools like cert-manager, SPIFFE/SPIRE, or step CLI with systemd timers. Make sure services reload certificates from disk without a restart. During rotation, put the new certificate in place before revoking the old one, then confirm the new one is actually being served.
Alert if NTP drift goes past 30 seconds.
| Symptom | Likely Cause | Recommended Check |
|---|---|---|
x509: certificate has expired or is not yet valid |
Clock skew or actual expiry | Check NTP offset and openssl x509 -text |
no cipher suites in common |
TLS version mismatch | Verify minimum TLS version on both ends |
| Valid cert on disk but server fails | Stale in-memory cache | Ensure server reloads certificates without a restart |
| Handshake failure with valid cert | Missing intermediate CA | Confirm the full chain is included in ssl_client_certificate |
403 Forbidden after successful TLS |
Identity mapping failure | Check if CN/OU matches the gateway's consumer record |
Write down the emergency replacement process now, not later. If a certificate needs to be replaced fast, the steps should already be clear: revoke it, reissue it, and update the identity map.
FAQs
Do I need mTLS if I already use API keys?
Not necessarily. API keys are useful for monitoring and rate limiting, but they don't give you the same level of security as mTLS. That's because mTLS checks both the client and the server.
If you need strict client authentication, mTLS is a smart add-on. If the use case is less sensitive, API keys on their own may be enough.
What certificate field should I use for identity?
Use userPrincipalName for identity.
A common setup is to map the certificate’s PrincipalName field to the user object’s userPrincipalName attribute.
That way, the identity in the X.509 certificate lines up with the user account in your identity provider during certificate authentication.
How often should client certificates be rotated?
Client certificates should be rotated on a regular schedule, usually every 90 days to 1 year.
Shorter certificate lifespans are becoming more common. That’s why automated rotation is strongly recommended. It helps prevent outages caused by expired certificates and supports day-to-day security.