How Kubeflow Simplifies ML Deployment
Kubeflow is a toolkit designed to make deploying machine learning (ML) models easier by managing the entire ML lifecycle on Kubernetes. It addresses common challenges like disconnected workflows, inconsistent environments, and scaling issues. With tools for training, hyperparameter tuning, and model serving, Kubeflow transforms ML projects into scalable, production-grade pipelines.
Key features include:
- End-to-End ML Lifecycle Management: From training to deployment, all within Kubernetes.
- Modular Design: Use only the components you need, like KServe for serving or Katib for tuning.
- Scalability: Handles large-scale workflows, as seen with Spotify and Shopify's use cases.
- Automation: Supports automated pipelines, resource allocation, and recurring tasks.
- Cost Efficiency: Options like scale-to-zero and spot instances help reduce expenses.
Kubeflow's integration with Kubernetes ensures consistency across environments, making it a powerful solution for teams looking to streamline ML operations.
Build your machine learning pipeline with Kubeflow
sbb-itb-903b5f2
Setting Up Your Environment for Kubeflow
Kubeflow Component Resource Requirements: CPU, Memory & Storage Breakdown
Prerequisites
Before diving into Kubeflow, make sure your Kubernetes cluster meets a few essential requirements. First, it must be running Kubernetes version 1.31 or later. For production setups, aim for at least three nodes, each with 4 CPU cores and 16 GB of RAM.
You'll also need kubectl (v1.21+) and kustomize (v5.4.3+). Additionally, your cluster must have a default StorageClass configured to handle dynamic provisioning. Without this, Kubeflow won't be able to create the Persistent Volume Claims required for features like notebooks and pipeline metadata.
One potential hiccup to prepare for: Kubeflow manifests might fail initially due to delays in registering CRDs. To address this, use a bash retry loop with kubectl apply until the process completes successfully. And don’t forget to change the default credentials immediately - leaving the default (user@example.com / 12341234) exposed is a serious security risk.
"Self-hosting with Kubeflow eliminates per-minute compute charges, keeps all data within your own cluster, runs on any cloud provider or on-premises hardware, and allows complete customization of every component." - Vultr Docs
Once you’ve covered these basics, you’ll be ready to set up your ML project for scalable and reproducible workflows.
Structuring Your ML Project
As your machine learning pipelines grow, having a well-organized project structure becomes increasingly important. A common approach is to use GitOps tools, like ArgoCD or Flux, to manage your Kubeflow configurations declaratively. Pair this with Kustomize overlays to handle staging and production configurations without duplicating code.
For the pipeline itself, break down workflows into modular, containerized steps - for example, separate containers for data ingestion, preprocessing, training, and evaluation. Use the KFP SDK decorators (@dsl.component and @dsl.pipeline) to define these steps as a Directed Acyclic Graph (DAG). To ensure consistency across environments, pin your base images to specific versions. Additionally, leverage Kubeflow Profiles to isolate namespaces for different teams or stages, giving you better control over RBAC and resource quotas.
With a strong project structure in place, the next step is to plan your resources effectively.
Resource Planning and Cost Estimates
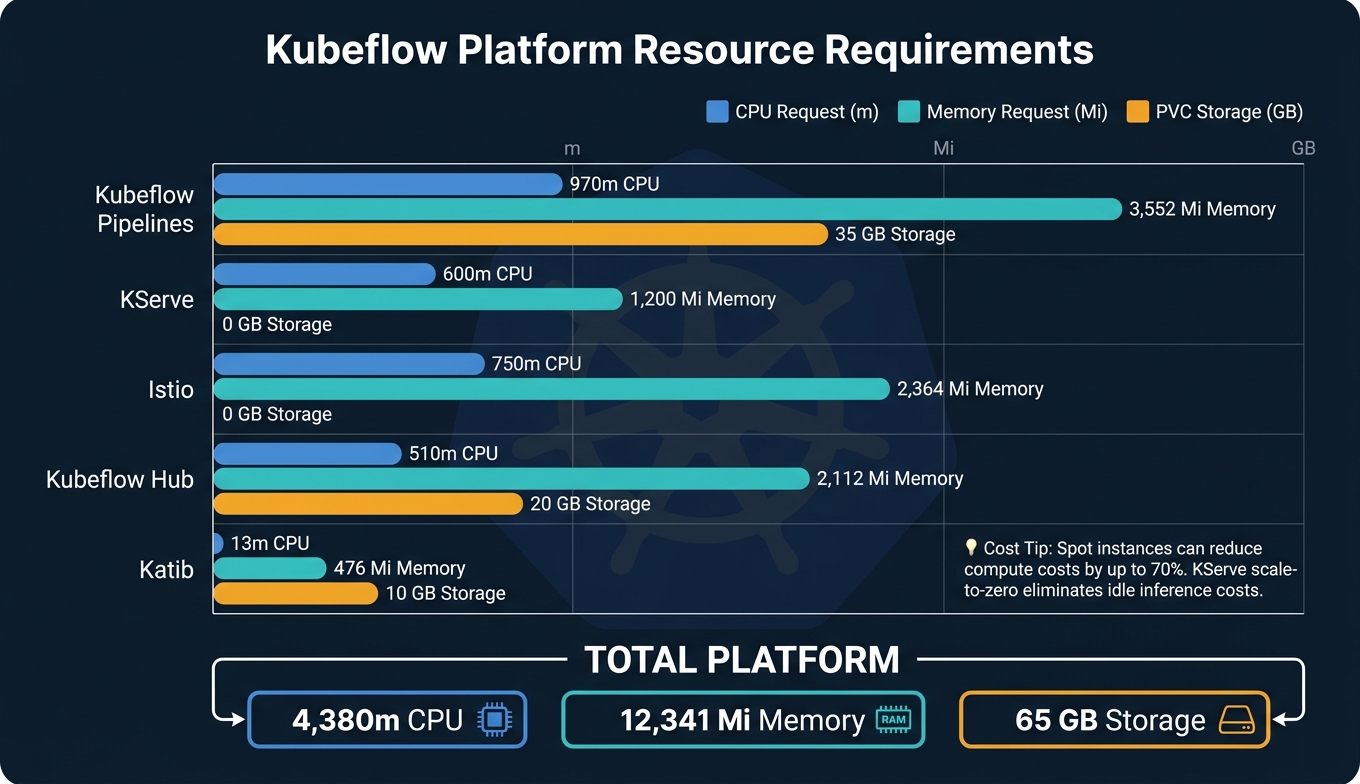
A full Kubeflow installation typically requires around 4.38 CPU cores, 12.3 GB of memory, and 65 GB of persistent storage across all components. Here’s a breakdown of the major components to help you allocate resources:
| Component | CPU Request | Memory Request | PVC Storage |
|---|---|---|---|
| Kubeflow Pipelines | 970m | 3,552 Mi | 35 GB |
| KServe | 600m | 1,200 Mi | 0 GB |
| Istio | 750m | 2,364 Mi | 0 GB |
| Kubeflow Hub | 510m | 2,112 Mi | 20 GB |
| Katib | 13m | 476 Mi | 10 GB |
| Total Platform | 4,380m | 12,341 Mi | 65 GB |
For cost planning, a three-node DigitalOcean cluster for Kubeflow runs about $200 per month. On AWS, m5.xlarge instances are a good choice for general workloads, while g4dn.xlarge nodes are better suited for GPU-based training. To cut costs, consider using spot instances, which can reduce compute expenses by up to 70%. Additionally, KServe’s scale-to-zero feature helps eliminate idle inference costs.
Building and Running ML Pipelines with Kubeflow
What are Kubeflow Pipelines?
Kubeflow Pipelines (KFP) is a platform designed to simplify the creation and deployment of machine learning workflows. It uses containerized environments to ensure portability and scalability for these workflows. Each pipeline is structured as a Directed Acyclic Graph (DAG), where every node represents a specific task - like data ingestion, preprocessing, or model evaluation - and the connections between nodes define the flow of data.
"A pipeline declares the logical structure for executing components together as a machine learning (ML) workflow in a Kubernetes cluster." - Kubeflow Documentation
The platform includes six main components:
- A Python SDK for defining workflows
- A DSL Compiler that converts Python code into a YAML configuration
- A Pipeline Service that integrates with Kubernetes
- Orchestration controllers (like Argo Workflows) to execute the containers
- A dual-storage system for metadata and artifacts
- A user-friendly web interface for managing and visualizing pipeline runs
This setup provides a solid foundation for designing and optimizing machine learning pipelines.
Creating a Basic Pipeline
To build a pipeline, you start with the KFP SDK (latest version 2.16.1 as of mid-2026). Each step in the pipeline is defined as a component using the @dsl.component decorator. These components are then linked into a pipeline using @dsl.pipeline, where the output of one step feeds directly into the next, adhering to the DAG structure.
In February 2026, Nawaz Dhandala from OneUptime showcased a complete end-to-end pipeline using kfp==2.16.1. His example included three key components:
load_data: Generated a sample dataset.train_model: Trained a model using RandomForestClassifier.evaluate_model: Assessed the model's performance, accepting or rejecting it based on an accuracy threshold of 0.8.
He compiled the pipeline into a YAML file (simple_pipeline.yaml) using compiler.Compiler().compile() and deployed it with kfp.Client() to http://localhost:8080. This example highlights how Kubeflow simplifies the process of turning complex workflows into repeatable pipelines.
Once compiled, the YAML file can be uploaded via the Kubeflow UI or triggered programmatically. For resource-intensive tasks like data preprocessing, caching can be enabled using .set_caching_options(enable_caching=True). This feature can cut training costs by 40–60% by avoiding redundant computations when inputs remain unchanged.
These tools and features not only streamline pipeline creation but also improve efficiency through containerization.
Benefits of Containerized Pipelines
One of the standout features of Kubeflow Pipelines is that each step runs inside its own container. This approach eliminates common issues caused by environmental inconsistencies, such as mismatched library versions across development, staging, and production environments.
"Containerization ensures consistent execution across environments and makes dependency management transparent." - GoCodeo
Deploying and Managing Models with Kubeflow Serving
How Kubeflow Serving Works
Once your pipeline generates a trained model artifact, the next step is deploying it as an API endpoint. Kubeflow simplifies this process using KServe (previously known as KFServing). Built on Kubernetes, KServe manages the entire lifecycle of a deployed model, handling tasks like load balancing, health checks, autoscaling, and networking.
Instead of manually creating a Flask or FastAPI wrapper and building a custom Dockerfile, KServe allows you to point directly to your model artifact stored in S3, GCS, or a PVC, and specify the framework. KServe then takes care of the rest.
"KServe provides a Kubernetes Custom Resource Definition for serving machine learning (ML) models on arbitrary frameworks. It encapsulates the complexity of autoscaling, networking, health checking, and server configuration." - MLOps on vSphere Documentation
One standout feature of KServe is its ability to scale to zero, shutting down idle pods to save costs. However, for applications where latency is critical, it's a good idea to set minReplicas: 1 to avoid cold-start delays.
Step-by-Step Model Deployment
Deploying a model with KServe is a straightforward process. The training component in your pipeline must declare an Output[Model] artifact and save it with the correct naming convention. For instance, scikit-learn models should be saved as model.joblib or model.pkl. Using the wrong naming format can prevent the predictor from loading the model.
Here’s a breakdown of the deployment workflow:
| Step | Action | Details |
|---|---|---|
| 1. Artifact Output | Define Output[Model] |
The training component outputs a model artifact. |
| 2. Save Model | Use standard naming | Save the model as model.joblib, model.pth, etc., in the artifact path. |
| 3. Define Component | Create deploy_op |
Use a Kubeflow Pipeline (KFP) component with kserve and kubernetes Python packages. |
| 4. Spec Configuration | Set storage_uri |
Link the InferenceService storage URI to the pipeline's model.uri. |
| 5. Apply Resource | kserve_client.create() |
Use the KServe Python SDK to apply the InferenceService manifest. |
| 6. Verification | Check READY status |
Confirm the READY status of the custom resource definition (CRD). |
By default, the deployed model is accessible via an internal cluster URL, such as http://{model-name}-predictor-default.{namespace}.svc.cluster.local. To enable external access, you’ll need to configure an Istio Ingress Gateway and set up TLS certificates.
Once your model is live, managing updates and rollbacks becomes a key part of keeping your deployment stable.
Managing Model Versions and Rollbacks
KServe supports versioning directly through the InferenceService status, tracking both PREV and LATEST model versions. To test a new model without fully replacing the current one, you can use the canaryTrafficPercent field in the manifest. For example, you might route 90% of traffic to the stable model and 10% to the new one.
For rollbacks, production teams can rely on GitOps practices. Store your InferenceService YAML manifests in a Git repository and use a tool like Argo CD to manage deployments. If a new model version doesn’t perform as expected, you can easily roll back by running git revert, avoiding manual intervention in the cluster.
The Kubeflow Model Registry also plays a critical role here. It tracks each model’s lineage, linking it back to the specific pipeline run that created it. This ensures you always know which model is running in production and its origins.
Scaling and Automating MLOps with Kubeflow
Kubeflow simplifies resource management and automates machine learning workflows, making it easier to transition models from development to production.
Scaling Workloads with Kubernetes
Kubeflow taps into Kubernetes' powerful resource management features. Each pipeline component can request specific resources like CPU, memory, or GPUs. For instance, a resource-intensive training step can utilize an NVIDIA A100 GPU, while a simpler preprocessing task might only need a standard CPU node. These limits are set at the component level using parameters such as cpu_limit and memory_limit, while Kubernetes ResourceQuotas ensure fair resource allocation in multi-tenant environments.
For components handling large datasets, it's recommended to set memory requests to about 80% of the memory limit to reduce the risk of Out-of-Memory (OOM) errors.
Kubeflow Trainer v2 enhances distributed training by introducing a unified TrainJob API that works seamlessly across frameworks like PyTorch and JAX, replacing older framework-specific CRDs. It also includes Topology-Aware Scheduling (TAS), which optimizes NVLink bandwidth for large-scale distributed training jobs.
These advanced configurations enable fully automated and scalable MLOps pipelines.
Automating MLOps Pipelines
Kubeflow's automation capabilities truly shine with its pipelines. Kubeflow Pipelines (KFP) support recurring runs using cron expressions, making it possible to schedule tasks like weekly retraining jobs that incorporate fresh data without requiring manual input. Conditional logic, implemented with dsl.If, adds another layer of automation by allowing models to be promoted to production only if they meet specific validation accuracy thresholds.
Katib simplifies hyperparameter tuning by managing parallel trial pods using strategies like Bayesian optimization, grid search, or random search. For teams using CI/CD practices, KFP integrates with tools like GitHub Actions or Argo CD, enabling end-to-end pipeline execution - from preprocessing to deployment - triggered by a code commit or data update. As Harshalsant, a Principal Architect, aptly put it:
"Machine Learning systems don't fail in model development - they fail in production." - Harshalsant, Principal Architect
Monitoring and Logging
Once pipelines are automated, monitoring becomes critical. KServe provides operational metrics such as latency, request counts, and resource usage, which can be collected by Prometheus and visualized in Grafana dashboards. To streamline this process, post-deployment steps can automate the configuration of Prometheus targets and Grafana dashboards.
For deeper insights, KServe logs prediction requests and responses to external systems like Kafka. This data is invaluable for identifying issues like data drift or model performance degradation over time. When paired with tools like EvidentlyAI, automatic drift detection becomes possible, triggering retraining workflows when necessary.
Additionally, application logs from model servers are centralized using Kubernetes logging agents like Fluentd, aiding in debugging. Meanwhile, ML Metadata (MLMD) tracks the complete lineage of each run, including datasets, code versions, and model artifacts, ensuring compliance and simplifying diagnostics.
Conclusion: Key Takeaways
Benefits of Using Kubeflow
Kubeflow simplifies the entire machine learning (ML) lifecycle by bringing all stages - like Notebook exploration, distributed training, automated pipelines, and production serving - into one Kubernetes-native platform. This approach tackles common challenges like disconnected workflows, inconsistent environments, and scaling issues. Plus, Kubeflow offers flexibility by running on AWS, Google Cloud, Azure, on-premises setups, or even hybrid environments, ensuring you're not tied to a single cloud provider.
Tools like MLMD and the Kubeflow Model Registry make it easier to reproduce results and safely promote models, helping avoid the risks of deploying unvalidated models. As Alex Ostrovskyy aptly stated:
"Kubeflow has solidified its position not just as a tool, but as the Operating System for Machine Learning."
Another advantage is cost efficiency. Since Kubeflow is self-hosted, you only pay for the compute resources you use - there are no added per-minute management fees. Features like KServe's scale-to-zero ensure idle endpoints don't unnecessarily drain your budget.
Getting Started with Kubeflow
To begin, use Kubeflow Notebooks for interactive model development and validation. Once ready, package your logic into KFP pipeline components, setting clear resource limits. For production, deploy with KServe, which supports autoscaling and canary rollouts. Alternatively, you can install standalone components like KServe or Katib.
If your team uses GitOps, integrating with tools like ArgoCD or Flux makes model promotion as simple as committing to git - no manual steps required. Start small, test the full workflow, and gradually scale up to create the reproducible, efficient ML operations that Kubeflow is built for.
FAQs
Is Kubeflow overkill for small ML teams?
Kubeflow is an open-source platform built to handle machine learning operations (MLOps) at scale. It's particularly well-suited for larger teams that have dedicated DevOps support, thanks to its comprehensive features for deploying and managing machine learning models. However, its setup process and ongoing maintenance can be quite demanding. For smaller teams or initial projects, Kubeflow might feel overwhelming, as it requires significant resources to manage. That said, it offers a solid, scalable framework for those who need complete control over their machine learning workflows.
What’s the hardest part of installing Kubeflow on Kubernetes?
Installing Kubeflow on Kubernetes comes with its fair share of challenges, especially when it comes to handling dependencies and retry loops. These are crucial for successfully registering resources like CRDs (Custom Resource Definitions) and webhooks. The entire process usually takes around 10–15 minutes for all pods to reach a "Running" state. During this time, you'll need to pay close attention to ensure everything is configured properly. Even small missteps can lead to delays or setup issues.
How do I avoid cold starts with KServe scale-to-zero?
To avoid cold starts when using KServe's scale-to-zero feature, consider setting minReplicas to 1 instead of 0. This ensures at least one pod remains active, which helps minimize delays when incoming requests arrive.
For models that are used infrequently but require low latency, you can tweak the scale-to-zero-pod-retention-period. This option allows you to keep replicas "warm" for a short time, reducing the time it takes to handle requests.
It's particularly important to avoid setting minReplicas to 0 for large models, such as large language models (LLMs). These models often take several minutes to load, which can lead to significant delays and impact user experience. Keeping at least one replica active ensures faster response times.